Monday, February 24, 2014
CHRISTMAS KITCHEN DECOR

I find it hard to fit Christmas decorations into my small kitchen so I went looking for inspiration this
year. I found wreaths hung on cabinets which I adored but this felt too big for my little space still.
I kept searching. Then I found simpler embellishments hanging over double exterior doors and I was
off to the races. I just had to work on a smaller scale!
 |
| walmart wreath bought 2 years ago |
I had everything I need to make them and started stealing bits from an old wreath I wasnt using.
Consider buying a whole wreath if you have several cupboards you want to do. Look at how many
pieces they have to use and Im sure this one cost less than $24 a few years back. Another alternative
for inexpensive faux greenery is the thrift store. People donate it and they bag it up for sale.

I hot glued several leaves overlapping for the flat base, this is how I established the size I
wanted my finished pieces to be. Then I used faux pine, pine cones and faux berry sprigs.
 |
| long twist ties can be reused from new packages of Christmas lights |
It is best to use ribbon that has a wired edge or your bow will sag. Each door will need about 5 feet of
ribbon. Start at one end of your ribbon and fold it over to make loops that will end up being your
bow. Keep pinching these together in the center until you have the number of loops you want. Finish
off by wrapping a long twist tie or wire around the center where you have been pinching it. Make
sure to leave a foot and a half or more of your ribbon to hang over the cabinet door.

Now take that bow you made and attach it to your greenery with the wire.

Ive hung mine with some tape on the inside of the cupboard doors.

HAPPY CHRISTMAS DECORATING!!!!
JOY JARS christmas tutorial

Ive nicknamed this project JOY JARS for the first set I ever saw
done by Miss Niamh of Kathleen Thomas Designs

This is a simple tutorial with big impact and continued use.
Its also another use for our ever loving Mason Jars we ALL collect.

Supplies:
Bath Salts - $8 Walmart 4kg
Metal Spray Paint
Tealite Candles
Adhesive Letters
Canning Jars w/lids

Start with getting your lids painted in the color of your choice.
Using a metal spray paint will ensure durability.

Fill the number of jars you need for your perfect word with your Epsom Salts.
Fill to the bottom of the threads.

Next adhere the letters to your jars.
Use the opposite side to any original lettering your jars already have.

Add your tealite.
If put at the right level to the jars threads the flickering candle light will bounce off the rings.

After the holidays,
remove the candle, screw the lids on, and add them to your bathroom decor
with the original lettering facing out.

You now have the perfect excuse to take a nice long bath.
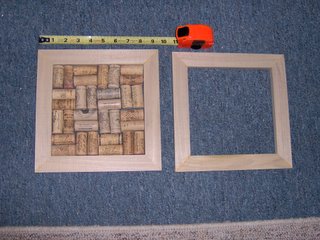
Wine cork trivets
I got the idea for making wine cork trivets from seeing some made by my uncle Bernie.
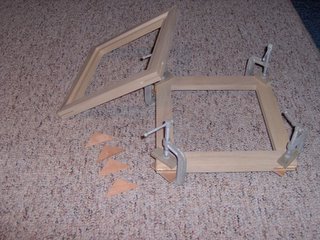
Mine have mitered and glued corners and a recessed bottom for a piece of 1/4 inch plywood. Mitered corners are weak because it is glued end grain to end grain. So I soup it up a bit by adding a triangular spline to each corner.
To do the splines I first built a jig. This device runs down the fence of the tablesaw and holds a frame corner point down. I set the height of the blade so it doesnt cut all the way through (less to fuss over later) and then the fence so the slot is cut near the center of the frame corner. Then, 4 quick passes, turning each corner down and clamping to the jig for each pass.
Next I take a contrasting type of wood and plane it until it can slide in the spline slots, but snugly. I cut this into triangles using the bandsaw. Each triangle gets glue on both faces and the long edge. The triangle is pressed into the slot and then clamped into place. Pieces of scrap wood protect the face of the frame from the metal of the C clamps. Splining like this glues face grain of the triangle to the face grain (inside of the slot) of the corner. It is incredibly strong and will probably never come apart.
Looks good too.
These wine cork trivets are made of poplar with cherry splines.
Two of the five. They measure about 9 inches on each side.
All 5 after glue up. Corks are mocked up, but not ready to install yet.

Spline slots and cherry splines have been cut. One is glued up and the others are waiting.
ReadMore...
Mine have mitered and glued corners and a recessed bottom for a piece of 1/4 inch plywood. Mitered corners are weak because it is glued end grain to end grain. So I soup it up a bit by adding a triangular spline to each corner.
To do the splines I first built a jig. This device runs down the fence of the tablesaw and holds a frame corner point down. I set the height of the blade so it doesnt cut all the way through (less to fuss over later) and then the fence so the slot is cut near the center of the frame corner. Then, 4 quick passes, turning each corner down and clamping to the jig for each pass.
Next I take a contrasting type of wood and plane it until it can slide in the spline slots, but snugly. I cut this into triangles using the bandsaw. Each triangle gets glue on both faces and the long edge. The triangle is pressed into the slot and then clamped into place. Pieces of scrap wood protect the face of the frame from the metal of the C clamps. Splining like this glues face grain of the triangle to the face grain (inside of the slot) of the corner. It is incredibly strong and will probably never come apart.
Looks good too.
These wine cork trivets are made of poplar with cherry splines.
Two of the five. They measure about 9 inches on each side.
All 5 after glue up. Corks are mocked up, but not ready to install yet.
Spline slots and cherry splines have been cut. One is glued up and the others are waiting.
Sunday, February 23, 2014
SAVE MONEY my screw drawer

Something I find very handy and saves a great deal of money on screws is my screw drawer.

I dismantle a great deal of furniture and when I do this I keep all the screws and other misc. hardware.

All the screws go to the screw drawer where I have an old cookie sheet that spreads them out.
When I need screws for another project I can simply search back and forth over the tray
and find what I need.
THRIFTING SUBSCRIBING

Here are some of the many treasures I found this past weekend.
I need more furniture like I need another hole in the head!
Ive been up cycling standard jewellery boxes but Ive been wanted to try my hand
at altering a big beautiful silverware box into a jewellery drawer.
I think this would be handier for us ladies with large collections of bling.

Looks like the time has come and Ill have to find just the right graphic for the top.


While we were out thrifting we had the chance to stop in and visit The Passionate Home.

I decided to walk in with my fabulous blue hydrangeas I had just purchased (second hand).
When Carrie saw the cheap price tag I believe she called me a colorful name @#$%^
That is what its all about, getting out there and finding amazing deals on things you love.
She had also just spend full price for some store display hydrangeas. Wink!

I often pick up bits and pieces of wood and metal objects to incorporate into
new and unique pillar candle holders. I was able to find a few more pieces to play with.
The starfish dish (made in spain) is for my collection of things I adore.
Now if I can just find the matching one I have stashed around here somewhere.
I spent all Saturday night and early Sunday cleaning, painting, and polishing
some new finds to get some nice photos taken.
Stop in to see the new shabby chic white hardware available at firstfinds.


Id also like to Welcome all my new subscribers who came over from Facebook yesterday,
(I see Second Chance Furnishings on the list this morning)
and update my current subscribers with what has been going on ...
Feedburner, the program Google uses to email blog posts to subscribers has been sending out
random posts from the past and at this time there is little I can do to stop it.
Google offers no solution to the many bloggers that this is happening to.
Because of this many are choosing to unsubscribe.
I will always respect your choice to receive and read what you wish and if these repeat emails are
causing you to consider leaving I wanted you to know what is going on.
You can always check the date the posting came out right at the top under the title.
FRENCH WINE TEASER project this week

George spotted this wine crate at a yard sale and suggested I use the graphics on my next project.


I bought this charming fluted leg table with 2 drawers at a fundraiser a few weeks ago.

Remember the title of this post did say *TEASER*
STAY TUNED !!!
Saturday, February 22, 2014
Small diameter turnings part 1
Hi Everyone,
Well, since everyone seems preoccupied with the SuperBowl today I thought Id do a little work in the wood shop and get away from it all for a while.
One of my goals for this year is to develop a method for making small diameter boxes (<1" in diameter) and now that I have a drill press, I can do more precise drilling so I thought Id give that a whirl today.
I had a small piece of 2x2 red oak and I cut off two pieces, the top and the bottom sections and I also decided to cut off a small piece of copper pipe to use both as a sleeve and as a method for keeping the two pieces together while I turned the whole unit on the lathe:


Next, I marked the centers on each end of each piece of wood:


I tried to make each piece match up and I turned the top around but no luck. The wretched thing isnt going to work.
But I decided to try and turn it anyway, both to see if the top and bottom would hold together while I turned it and simply out of a forlorn hope that the project might still work out.
Here is the top and bottom on the lathe between centers. You can really see how the pieces dont match up:

Here is the box after its been turned for a few minutes:


ReadMore...
Well, since everyone seems preoccupied with the SuperBowl today I thought Id do a little work in the wood shop and get away from it all for a while.
One of my goals for this year is to develop a method for making small diameter boxes (<1" in diameter) and now that I have a drill press, I can do more precise drilling so I thought Id give that a whirl today.
I had a small piece of 2x2 red oak and I cut off two pieces, the top and the bottom sections and I also decided to cut off a small piece of copper pipe to use both as a sleeve and as a method for keeping the two pieces together while I turned the whole unit on the lathe:
Next, I marked the centers on each end of each piece of wood:
Then I drilled a hole in each piece with the new drill press:
Then I tapped the copper sleeve into what would become the bottom piece and proceeded to put them together--if the top and bottom match up, Im declaring a major victory...
...and viola!! They dont match up at all...sigh...
But I decided to try and turn it anyway, both to see if the top and bottom would hold together while I turned it and simply out of a forlorn hope that the project might still work out.
Here is the top and bottom on the lathe between centers. You can really see how the pieces dont match up:
And here are the finished pieces off the lathe. Another potential addition to the firewood box:
Discussion:
While I have made a number of large diameter items on the wood lathe, small diameter turning are still something I havent much experience with and as precision becomes more of an issue with small turnings, I am going to need to do more measuring and stop relying on doing this type of thing "by eye." And the drill press and I need a lot more practice (and a drilling vice wouldnt hurt either) in order to precisely center the holes.
Ok, well chuck this one up to absent wood angels who are probably getting ready for the Super Bowl instead of watching over me in the wood shop.
Next project: salt and pepper shakers.
Thanks for dropping by and I dont know about you but Im watching Downton Abbey tonight!!!
VW
first woodworking project
 |
| first woodworking project |
When I commenced woodworking, my grand daddy showed me how to operate the wood tools as well as taught me the choice to safely utilize the woodworking machines. However, if you dont have your own grandfather that will help you safely begin your woodworking projects, youll want to find one more source of advice and creativity for your projects.
If you are first starting off youll want to choose woodworking plans which match your woodworking expertise. Use the Kiss and lick method: keep it uncomplicated stupid. You just arent going to cash of a woodworking pastime if you by no means get through your current first project. Yet performed correcly, your family will probably be impressed as well as your friends is going to be amazed, and you will probably move on to more woodworking projects, leaving a long lasting legacy on your family.
Although my grand daddy would come with ideas for farm-style wood furniture that we would likely build, if you are first starting off you arent going to build your own woodworking plans. Therefore youll need to locate a plan in which excites a person, gives you reliable step-by-step instructions, takes you through with all the wood tools and also the woodworking machinery, as well as grows the woodcraft skills. The top plans include a total planning listing that includes components, required resources, and ideas on levels of skill with people tools.
Youll find plans on the Internet and throughout woodworking magazines that you could pick up your local raw wood store. I discovered that many with the plans that I have downloaded online arent comprehensive, or usually are not accurate. Usually theyre the merchandise of an newbie draftsman versus a specialist furniture designer. An improved alternative would be to go to the collection and check out lord instructional textbooks full of content articles, plans, and ideas without paying anything.
Another substitute is to please take a woodcraft course that will steps you thru the process of wisely growing the woodworking skills inside a logical method so that as you skill progresses, ignore the in wood equipment and woodworking machines also normally progresses. It does not make sense to get thousands of dollars inside equipment that you just never make use of. But it can make sense to buy the right tools for the best project that stimulate you to go on to the next level of your respective ability.
In the end you want to take your current woodcraft experience and build your own woodworking plans that contain your design suggestions and abilities that youve designed along the choice. This may cause your woodworking project entirely your own--a one-of-a-kind manufactured goods is your personalized work of art. A number of wood workers possess even made their own items that they sell with furniture stores as well as art homes, making money off their hobby.
 |
| good first woodworking project |
Siwek Lumber wow!
Hi Everyone,
Well, I went out to a new lumber yard, Siwek Lumber, located in the Arts District in Minneapolis. What a find this was. They have an amazing variety of lumber and lumber products as well as all sorts of hardware, tools, and finishing products. They also have an amazing variety of softwoods-pine, cedar of every imaginable size, and douglas fir. I havent seen douglas fir in years as here in the midwest it tends to wind up in doors, window frames, flooring, etc. You dont see a lot of lumber for sale. I was really happy to see so much fir lumber as I grew up with it as a kid--it was like almost seeing an old friend after many years absence.
Ive been wanting to do some work in soft woods, particularly yellow pine and douglas fir due to their pronounced grain patters. The douglas fir I found was kiln dried, straight grained, and over all very sound.-in short prefect for turning so I bought several cut off pieces and brought them home to make platters out of .
They have a ton of hardwoods for sale, including wide widths, and large thickness. They also have some of the lesser known hardwoods like hackberry, sycamore, all sorts of maple, mahogany, you name it. And surprise, they had a big stack of Brazilian cherry, one of my favorites.
The staff is very friendly and helpful. And they have a big dog who is really nice and that sealed the deal. I will be making my way back there!!
VW
ReadMore...
Well, I went out to a new lumber yard, Siwek Lumber, located in the Arts District in Minneapolis. What a find this was. They have an amazing variety of lumber and lumber products as well as all sorts of hardware, tools, and finishing products. They also have an amazing variety of softwoods-pine, cedar of every imaginable size, and douglas fir. I havent seen douglas fir in years as here in the midwest it tends to wind up in doors, window frames, flooring, etc. You dont see a lot of lumber for sale. I was really happy to see so much fir lumber as I grew up with it as a kid--it was like almost seeing an old friend after many years absence.
Ive been wanting to do some work in soft woods, particularly yellow pine and douglas fir due to their pronounced grain patters. The douglas fir I found was kiln dried, straight grained, and over all very sound.-in short prefect for turning so I bought several cut off pieces and brought them home to make platters out of .
They have a ton of hardwoods for sale, including wide widths, and large thickness. They also have some of the lesser known hardwoods like hackberry, sycamore, all sorts of maple, mahogany, you name it. And surprise, they had a big stack of Brazilian cherry, one of my favorites.
The staff is very friendly and helpful. And they have a big dog who is really nice and that sealed the deal. I will be making my way back there!!
VW
Friday, February 21, 2014
Sams Balcony

 A couple of weeks ago, Sam installed the balcony he was working on back in September and October ... It was a very cool project with some somewhat daunting challenges. Build it here ... install it there, 15 in the air ... Make it safe ... That kind of stuff. I swung by last week and took some pictures ... Looks like it was made to be there .. Click the photos to enlarge them ..
 The platform with its expanded steel floor and outline of the rails
 Sam had made a couple of sketches but mainly, on this one, worked as the spirit and his vision moved him ..
 Until he had had basic decorative design figured out ...
 Next were the support brackets with some ideas sketched in ...
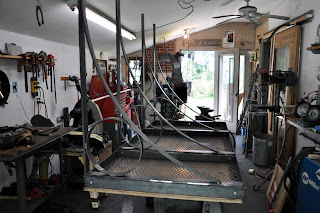 Back to the circular elements of the main railing
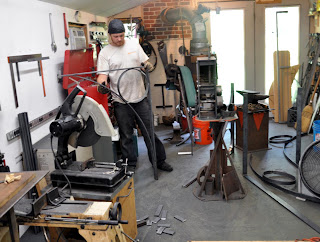
 and then a test assembly on the wall of the shop ...
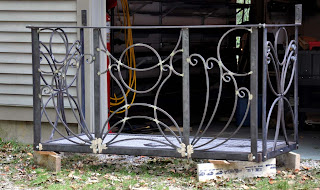 All welded up and ready to prime and paint
 One of the fishies on the floor of the balcony ...
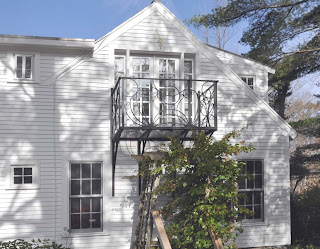 From afar
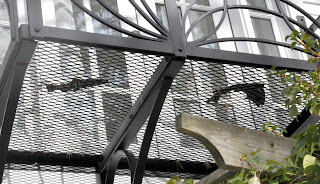 From below
 From the end, showing the 4 supporting brackets
Subscribe to:
Posts (Atom)